






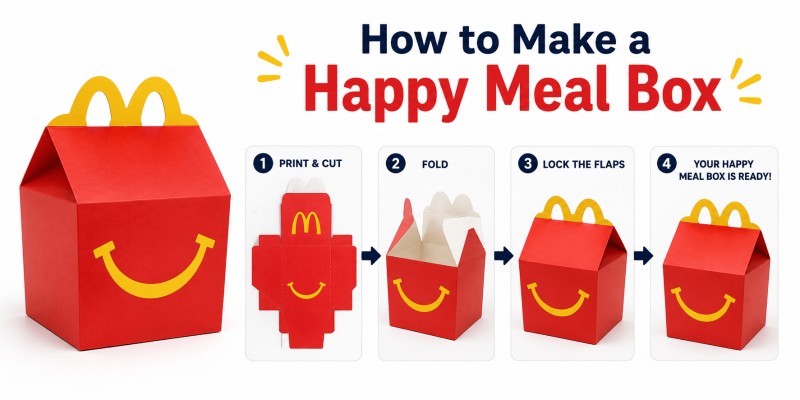
The Happy Meal box is one of the most recognizable pieces of packaging in the world. Made famous by the McDonald's Happy Meal box, this fun, colorful design has inspired countless DIY projects, party themes, and even small business packaging ideas. Whether you're a parent planning a McDonald's-themed birthday party, a student working on a craft project, or a small food packaging business owner who wants to recreate a similar style of happy meal boxes, this guide will show you exactly how to do it at home. In this article, we'll walk through everything you need: materials, measurements, folding techniques, and design tips to create your own happy meal box from scratch.
We'll also cover how to add a small toy compartment, similar to how a gold happy meal box toy is packaged inside the original McDonald's design, so your box feels complete and authentic. By the end, you'll have a sturdy, good-looking box ready for snacks, party favors, or creative gifting.
Why Make Your Own Happy Meal Box?
Before diving into the steps, here's why so many people search for this DIY project:
- Party Themes: Perfect for kids' birthday parties with a fast-food or retro theme.
- Business Packaging: Small food businesses and bakeries often recreate this design for meal boxes, snack boxes, or promotional packaging.
- Craft Projects: A fun activity for kids to learn folding, cutting, and design skills.
- Eco-Friendly Alternative: Making your own box means you control the material, such as cardboard, kraft paper, or recycled board.
- Cost-Effective: DIY versions are far cheaper than ordering custom-printed boxes in small quantities.
Materials You'll Need
To make basic Happy Meal Boxes gather the following supplies:
- Cardstock or thin cardboard (300–350 GSM works best for durability)
- Ruler and pencil (for measuring and marking fold lines)
- Scissors or craft knife
- Glue stick or double-sided tape
- Printable template (optional, but recommended for accuracy)
- Coloring markers, stickers, or printed designs (for decoration)
- Cutting mat (to protect your work surface)
If you want a professional finish similar to real fast-food packaging, using printed kraft board or coated cardstock gives the best texture and durability.
Choose or Create Your Template
The easiest way to start is by using a printable Happy Meal box template. You can find free templates online or design your own using tools like Canva, Adobe Illustrator, or even PowerPoint.
If designing from scratch, sketch a simple box net (unfolded layout) with:
- A rectangular base
- Four side panels
- Top flaps that fold and lock together
- Small tabs on the sides for gluing
A standard size for a mini meal box is around 4 x 4 x 5 inches, but you can scale this up or down depending on what you're packing inside.
Print and Cut the Template
Once your template is ready:
- Print it on cardstock rather than regular paper; this gives the box structure and strength.
- Use scissors or a craft knife to cut along the outer solid lines.
- Cut out any handle holes or decorative windows if your design includes them.
- Keep the fold lines intact; do not cut through dotted or dashed lines.
Fold Along the Marked Lines
Folding is the most important step in getting a box that looks professional.
- Start with the base folds first, pressing firmly along each line.
- Fold the side panels upward at 90-degree angles.
- Fold the top flaps inward to test how they'll close later.
- Make sure all folds are crisp and even uneven folds are the most common reason DIY boxes look messy.
Take your time here. A well-scored, well-folded box will hold its shape far better than one that's rushed.
Glue the Side Tabs
After folding:
- Apply glue or double-sided tape to the small side tabs.
- Press the side panels together firmly, holding for 10–15 seconds so the glue sets.
- Repeat for all four corners until the box forms a stable rectangular or cube shape.
If you're using tape instead of glue, make sure it's applied evenly so the box doesn't warp on one side.
Add the Handle (Optional)
Classic Happy Meal boxes often have a fold-out handle on top, making them easy to carry. To add this:
- Cut two symmetrical slits on the top flap where the handle will attach.
- Cut a strip of cardstock about 1 inch wide and slightly longer than the box's width.
- Insert the ends through the slits and fold them flat on the inside to lock the handle in place.
- Reinforce with a small piece of tape if needed for extra strength.
This step is optional but adds a lot to the authentic look and functionality of the box.
Add a Small Toy Compartment
One of the most fun parts of the original McDonald's Happy Meal box is the small toy tucked inside, sometimes a limited-edition gold Happy Meal box toy for special promotions. You can recreate this feature in your DIY version:
- Fold a small mini-pocket from an extra piece of cardstock, roughly 2 x 2 inches.
- Glue this pocket to one inner side wall of the main box, leaving the top open.
- Slide in a small toy, trinket, sticker sheet, or trading card as a surprise.
- If you want a "gold edition" look, wrap the mini toy in gold foil paper or use gold-colored cardstock for the pocket, a fun nod to special edition Happy Meal toy packaging.
This small addition makes your homemade box feel complete and gives kids that same excitement of discovering a surprise inside.
Decorate Your Box
This is where you can get creative:
- Kids' Parties: Add character stickers, bright colors, and party themes.
- Food Businesses: Print your logo, menu item name, or branding directly on the template before cutting.
- Educational Projects: Use the box to teach nutrition by drawing meal sections inside.
- Personal Gifts: Write names or messages on the box for a personalized touch.
You can hand-draw designs, use printed stickers, or run the template through a printer with your custom artwork already added before cutting.
Assemble and Fill
Once the glue has fully dried:
- Open the top flaps.
- Fill the box with snacks, toys, party favors, or whatever you're packaging.
- Fold the top flaps closed, tucking them into each other for a secure seal.
- Attach the handle if you added one.
Your homemade Happy Meal box is now ready to use.
Tips for a Professional Looking Finish
- Use quality cardstock: Thin paper will bend and lose shape quickly.
- Score before folding: This prevents cracked or uneven edges.
- Test-fold before gluing: Always dry-fit the box once before applying glue permanently.
- Print in bulk: If making multiple boxes, print several templates at once to save time.
- Laminate for durability: For boxes holding food, a thin food-safe laminate adds moisture resistance.
Common Mistakes you have to Avoid
- Skipping the scoring step leads to messy, uneven folds.
- Using paper that's too thin: the box won't hold its shape.
- Rushing the glue-drying time: tabs can pop open later.
- Ignoring symmetry: uneven templates cause a lopsided box.
- Overfilling the box: this stresses the folds and can cause tearing.
Conclusion
Making your own Happy Meal box is a simple, budget-friendly project that works for parties, crafts, or small business packaging. With the right cardstock, careful folding, and a bit of creativity, you can design a sturdy, good-looking box in under 30 minutes. Whether you're doing this for fun, for your kids, or to build custom packaging for your brand, following these steps will help you get clean, professional results every time.
If you're looking for custom-printed boxes in bulk with your own branding, sizes, and designs, check out our packaging services at CustomBoxesZone for a professional alternative to DIY.